
When you get to the end of the campaign in The Division 2 you will be asked to tackle 3 different Strongholds. These Strongholds are long and tough 30-50 minute missions. The District Union Arena Stronghold houses the Hyena faction and is the easiest. The Stronghold on Roosevelt Island is next and is fairly easy up until you get to the final mission. This one houses the Outcasts faction. The final Stronghold is the Capitol Building and is packed with enemies of the True Sons faction.
I am going to recommend a loadout and some tips on how to complete each of these Strongholds. As a general guide you should be at level 27-30 in order to effectively complete these missions solo and with a group.
The Division 2 Stronghold – District Union Arena
The District Union Arena is the easiest. I managed to get through it without dying once. However, it does require you to be aware of your surroundings.
In terms of loadout, I recommend an assault rifle and a shotgun or a light machine gun and a shotgun. For Skills I highly suggest running the Reinforcer Chem Launcher to heal yourself and the Cluster Seeker Mine to damage multiple enemies at once.
At the start you will have to deal with only a few enemies on the outside of the building. They shouldn’t cause too much of a problem. Follow the objective marker inside.

After opening the door, one Hyena will run to cover. Stick to cover and progress up the room until another two enemies spawn. Continue forward and you will find another four enemies clustered in a room. Use your Seeker Mine here to quickly take most, if not all of them out. A sniper will then spawn at the back of the room, take him out at a distance or up close with your shotgun. Whichever makes you more comfortable.
Now, open the gate and you will find more enemies in the next room, including one on a mounted turret. Use a grenade to take out the Hyena on the Turret. One of the enemies here will spawn small explosive vehicles that will seek you out and, well, explode. Try to take him out next, he does have some armor though.
Another enemy will flank you to your left. Take him out with a few of your shotgun shells. Head forward a little and another wave of enemies will spawn. There are a lot of explosive tanks here. You should shoot them whenever an enemy is next to it, likely killing them in the process.
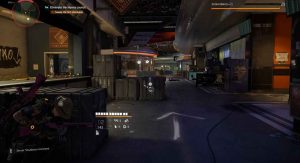
Head through the door and to the second concourse. Restock your supplies at the box on the floor and proceed onwards. This next room has a number of enemies I recommend heading to this piece of cover shown below.

Initiate the fight with your Seeker Mine, dealing a fair amount of damage to each target. There is an elite enemy here who will rush you. Try to take him out as soon as possible. After those four enemies are dead push onwards. You will enter a room that will contain a Rusher that will stop you moving for a bit. Once you regain control, quickly take the enemy out. At the back of this room restore the power.
You will then be ambushed by a few more enemies. They are only red bars, so they should be easy to kill. An elite Medic will then spawn. take him down as quickly as possible or he will revive some of the enemies you have already killed.
Open the shutters and continue on. This next room has a fair few enemies. So, use your Seeker Mine to start the fight.

The next room has a few enemies at the end. However, there is one sleeping on the couch to your left. Enter cover at the pool table and use your shotgun to take the sleeping Hyena out. Proceed to kill the rest of them in whatever way you want. This next room has nothing special, just use your seeker mine first and then finish off the enemies.
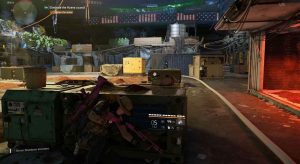
The Mall is the first big fight. I would wait until you have your Seeker Mine back to initiate the fight. Stick to the cover closest to the door where you entered. This room has a lot of armored dudes as well as an elite named enemy. That elite enemy can spawn a turret which will shoot electricity at you, locking you in place. Try to avoid that turret at all costs. Remember to use your Chem Launcher whenever your Armor is low, as it respawns fairly quickly.

Take out as many enemies as possible and head up the stairs on the left. There is a medic here, so try to take him out as soon as possible. The elite enemy should make his way to the top floor. When you have dwindled his armor down, rush him with a shotgun and hit has as much as you can.
Progress onwards and restock your supplies. The next room is another large fight. The garage houses multiple armored enemies, elites, and a mounted machine gun on top of a car.

Use your seeker mine to start the fight. The biggest threat is the machine gun; so, focus on it after taking out the immediate enemies that will rush you. Grenades are a great way to destroy it, alongside your weapon. Destroying it will spawn an Elite named enemy called Diesel. He has a lot of armor. Pump ammo into him until some of that armor cracks. Then target the exposed body parts to quickly take him down.
If you can, take out the red bar enemies first as they are just a nuisance otherwise. Progress onwards until your vision blurs. Hit the button in front of you to stop this effect.

Doing this will cause 3 enemies to spawn out of a door. Take them out either with gunfire or a grenade. I recommend the latter, as they are all next to each other. Continuing onwards you will reach the Arena. This is the last big fight in the Stronghold. Stick to the starting side at the beginning of this fight. Ensure you stay in cover as much as possible.
Start the fight with the Seeker Mine, and take out the enemies who will rush you. There is an armored sniper on the right side of the arena. Once most of the enemies are dead, a second wave will spawn on the left. Try to kill them as they drop down. Among this group is an Elite healer who should be a priority target. You should kill him quickly. After most of those enemies are dead, immediately run to the opposite side of the arena as a group of enemies will spawn behind you.
Among this group is a heavily armored enemy. Take out the red bar enemies and then pump bullets into that enemy. Then, return to your previous position as more enemies will now spawn behind you. Among this group is a named Elite called Dime.

Take out the side enemies before focusing on Dime. Dime has a riot shield. You can shoot that shield to destroy it. Instead, use a grenade or your Seeker Mine. After killing him the mission will be completed.
The Division 2 Stronghold – Roosevelt Island
This Stronghold is fairly easy up until the final room which is a huge pain. Bring the Reinforcer Chem Launcher to heal yourself and the Cluster Seeker Mine to damage multiple enemies at once. I recommend a light machine gun, assault rifle, shotgun and a marksman rifle for this Stronghold. You will want a scope on the Marksman Rifle, which can be crafted at the crafting bench in The White House.
After reaching the Stronghold you will face off against a few Outcasts. Use your Seeker Mine to start the fight and take out the remaining enemies. Unlock the gate and proceed onwards, restocking your supplies at the box along the way.

This next area has a handful more enemies as well as a small vehicle with sawblades attached. If you are hit by this, you will suffer from bleeding damage, which drains your health over a period of time. You can use a grenade once you reach this area to take out a good few of the enemies. Take out the rest of them with your weapons.
The next area will have around ten hostiles. Use your Seeker Mine to start the fight and make sure one of your weapons is the marksman rifle. Some of these enemies will rush you; however, most will stay back, which is where the rifle comes in. The second wave will introduce Suicide Bombers. Take these guys out as fast as possible as they can remove most of your armor if they blow up next to you.
The next area has another eight Outcasts. Push up fairly far and use your Seeker Mine to start the fight.

Most of the first wave should be dead. Once the second wave spawns, the Outcasts will rush you, use a shotgun or your machine to dispatch them quickly. One enemy will then drop down from the wing. Use the rope to scale it.
This next area is large for a reason. There are a bunch of enemies with flamethrowers. If they get up close they can decimate you. Therefore, stay back and fire at them from afar.

Eventually a named Elite enemy with a flamethrower will show up. Stay away from him and pummel him with Bullets from afar. In the next area you will have to protect Angela Woods from the Outcasts. Use your Seeker Mine to start and then quickly push up and fire at the rest of them. Once they have all been killed, you will need to destroy a fuel tank by the door. Pump machine gun bullets into it as it has a lot of health.

This next area is fairly simple. Use your seeker mine and take out the enemies as and when they pop out from cover. After they are dead head to the inner stronghold and take out the few enemies guarding it. You then need to open the gate. Proceed onwards and open this crate on the right of the next open area.

Pick up the explosive and place it on the gate to open it. A group of enemies, including suicide bombers will then rush you. Do not go through the gate, instead shoot them from behind it. Once they are dead push through. Another group of enemies will then approach. Once they are dead, a heavily armored elite known as The Basilisk will rush you with a hammer. Pump bullets into him, rolling out of the way of his attacks.

From there, a sniper as well as another elite enemy will head to the balcony in the centre of the area. Use grenades, your Seeker Mine, anything really to take them down.
Now follow the objective marker to the dock. Take out the couple of enemies on your way there. Ok, this part sucks. There are a bunch of enemies, multiple fuel tanks to destroy and a mounted turret. Go in with your shotgun and immediately find cover. Stick to that cover and use your chem launcher as much as possible. Blind fire with your shotgun to take down the enemies that are close by.

Once they are dead, switch to the marksman rifle and take out the Outcast on the mounted turret. Other enemies will go back to that turret, so be sure to watch out. Use your machine gun to kill the rest of them. Eventually they will stop spawning. Head to the left tank at the back of the map and pump bullets into it. Immediately after it is destroyed, run to the other side of the boat.
Put about 50-80 bullets into this fuel tank and then quickly find cover. Use your Seeker Mine to take out the enemies now rushing you. Picking them off with your weapons as well. Once those enemies are dead, finish off the fuel tank.
Make your way to the back of the area and fire on the rest of the enemies. There will be suicide bombers in this wave. There are also Outcasts with flamethrowers. So, be sure to stay far away.

There is also another elite enemy with a hammer. Use the same tactics as before. Try to have all other enemies dead by the time he reaches you. Once they are all dead, head onto the boat. At the back you can shoot the hatch and hit the switch to open it. Plant the explosive and evacuate the boat. That will complete this Stronghold.
The Division 2 Stronghold – Capitol Building
This Stronghold is the final one and the final mission in the game. Bring the Reinforcer Chem Launcher to heal yourself and the Cluster Seeker Mine to damage multiple enemies at once. I recommend a light machine gun, assault rifle, shotgun and a marksman rifle for this Stronghold.
At the start of the stronghold you will have to talk to the Civilian. This will cause the gate to open and allow you to progress up to the Capitol building. Once in the orange area on your mini-map take cover. You are going to have around 10-20 enemies coming at you over the next few minutes. Use your Seeker Mine whenever possible to deal damage to as many enemies as possible. Also, remember to use your Chem Launcher to heal often. You will also have to dodge from cover-to-cover periodically as mortars will be fired at your position.

Try to pick off the red bar enemies first. This area contains one armoured named elite who will stick the the centre of the area. He is a medic. So, try to take him out quickly or else he will revive other True Sons. Once that first wave is dead, you can push up slightly.
Now, you will have to take on even more True Sons. Stick to cover and use your Skills whenever you can. There are a number of armored enemies here. Try to hit their weak points to cause their backpacks to explode. Once they are all dead push up and open the gate.
The next area is similar, you just won’t have to dodge the mortars. Use a similar strategy. Be aware, there is a enemy with an RPG in this area, who will take off most of your armor if it hits you. Try to dodge the rockets and take him down as quickly as you can.

Once they are dead, follow the objective marker and activate the cannon. Head inside once the cannon has shot the door. Restock your supplies and head through the door. Switch to your shotgun and a machine gun. Take cover against the wall below and shoot the black disruptor in the centre of the room. Also, use your Seeker Mine skill.

This room has a bunch of armored enemies, including enemies that can lock you into place with sticky foam. Stick to this wall and pop out and shoot enemies as they pop up from cover. The enemy with the sticky foam launcher will push you and enter the hallway that you are in. Use your shotgun to take him out quickly whenever he does this. Once they are all dead, collect the briefcase.
Now enter cover at the back of the room as around ten enemies are going to come from where you just were.

These enemies will flank you, so be sure to keep looking to your side for them. Once they are all dead, continue onwards. In this next hallway you will be ambushed by a few enemies. Use your seeker mine and grenades to kill them easily. Once they are dead, go through the next door.
This room is compact and houses a lot of enemies. I recommend sticking to the back corner, just to the left of where you came in. Pick guys off from a distance and use your Seeker Mine as much as you can.

Once they are dead, continue on. The roof is the first big fight in this mission. There are a lot enemies with armor, as well as a True Son with an RPG. Stay as far back as you can using your Seeker mine where possible. Heal yourself constantly with the Chem Launcher as well.

These enemies will flank you, so always be aware of your surroundings and only fire when it is moderately safe. Once all the enemies are defeated, trigger the flare. The Helicopter will then get attacked. Head up the right side and back into the broken side of the Capitol Building. Now, head outside.
The Plaza is the final arena in this Stronghold. Take out the enemies in the first area and then head up to the first Radar. Stay up here and fire on enemies from the position below. Use your Marksman Rifle to take them out from afar. Be sure to spam your Seeker Mine as well.

Eventually, that first override will finish. Head to the second one on the opposite side of the arena. Stay in the position shown below, using the same tactics as the last one. Enemies will flank you from both sides. Just watch out and pump them full of bullets whenever you can. There is one elite enemy who shots the sticky foam at you. Make him a priority target as he can kill you easily if he gets close to you.

Once those enemies are dead and the override is finished attach the briefcase to the helicopter when it arrives. This is now your final battle. Stay on the raised platform with the second override; However, move into the back corner this time. An elite named enemy called General Antwon Ridgeway will stay on the middle walkway. Pummel him with everything you have got. Use a light machine gun and dispatch him quickly as enemies will keep spawning if he is alive.

Take out everyone else and follow the objective to the end of the Stronghold.
We hope this guide has helped you. We have a full hub of our The Division 2 content complete with news and other guides.