
Divinity requires a lot of work, both in real life and in Destiny 2. This Exotic Trace Rifle is the newest addition to Destiny 2 and is only obtainable from the new raid Garden of Salvation. However, unlike the past few weapons, like One Thousand Voices and Anarchy, that you get by chance. There are quest steps that have to be completed before and during the raid to acquire this new powerful Exotic. Let’s get divine.
Step 1:
The Lunar Battlegrounds
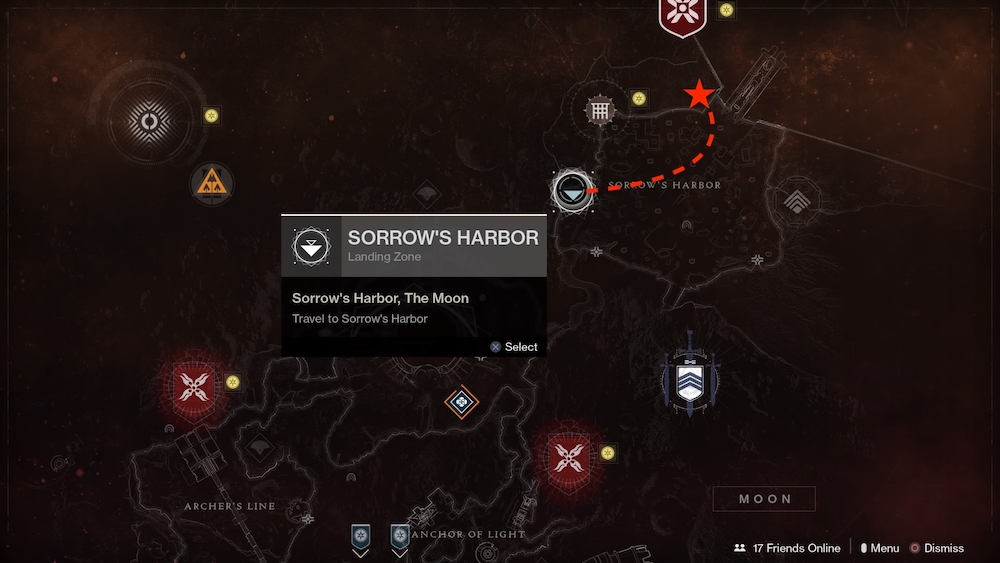
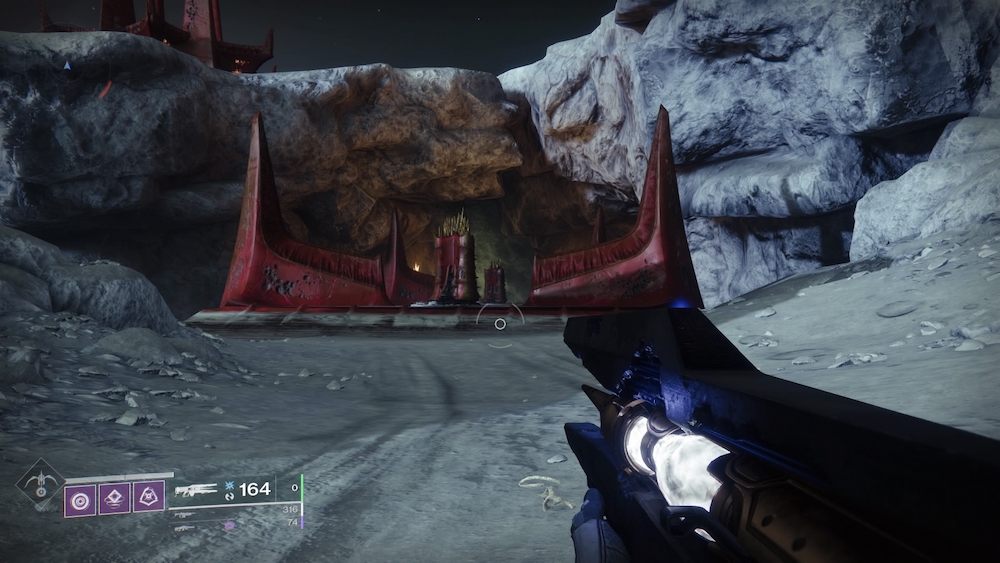
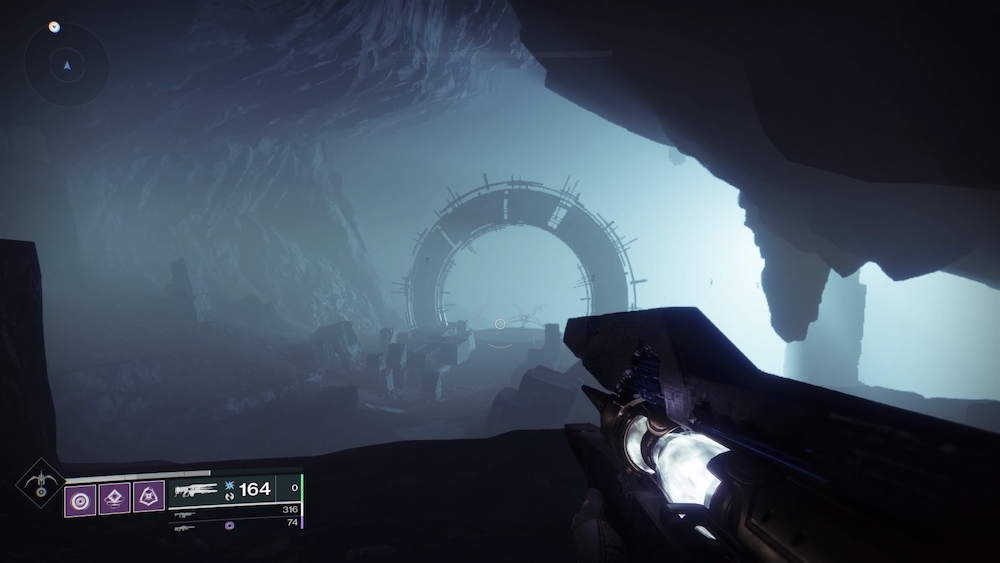
This will be the start of the raid. However, you will want to make your way there from Patrol. It will be close to the start of the game when you are defeating the shirkers. Head to Sorrows Harbor and head across the red bridge across the area to the right of where you spawn in. When the area opens back up, hug the left wall until you find the cave entrance. Once inside, kills the Vex as they pour out of the gate until you get a quest from a defeated Gate Lord.
Step 2:
Lost Sectors on Nessus
Go to Nessus and complete three Lost Sectors: The Orrery, The Conflux, and Ancient’s Haunt. Inside each one will be a conflux you will need to scan with your Ghost.
Step 3:
Kill 120 Vex
*This is easily achieved with the Vex Offensive.
Step 5:
Solve the Puzzles
This step is a doozie. You will be required to head into the Garden of Salvation Raid and complete puzzles. I, unfortunately, lost all the visual aids I had for this, so I’ll be linking a video to a well known Destiny 2 streamer, Rick Kackis. However, I’ll also do my best to guide you with my words. This step will require you to finish the raid, and it will need to be done in one sitting. So get comfy.
Puzzle 1:
At the start of the raid, turn around and drop off the lege behind you. Inside a small crack in the wall, you will see a switch. You will want to activate it to turn on all of the puzzles through the rest of the raid.
After turning the switch on, you won’t have to go too much farther to get to the first puzzle. When you arrive at a set of stairs (still before the first encounter), send three Guardians to the left and three to the right. The ones who go left will be the start of the tether and will have to position themselves accordingly to link up to the second group. The second group will have to do the same until the full tether and link are made.
After the connection is made, go ahead and complete the first encounter.
Puzzle 2:
At the end of the first encounter, while looking at the chest, head left going back into the first encounter. Not far after you turn back, you will notice a pink tree toward the right edge of the platform you’re on. On the side of this platform will be a game that you can fall into. Once all six Guardians are inside, you will need to position everyone around the center of the room and, like the first puzzle, connect everyone together.
Puzzle 3:
Before you get to the second encounter, you will have a major jumping section to get through. When you enter the room, head to the right and you will see a branch growing down from the ceiling. The puzzle is different this time, as it will require all six Guardians to be linked in a specific way to connect six nodes that will appear. Once all six Guardians make a circuit, they can move around while staying linked. However, if something get in the way to block the tether or a Guardian gets too far away from their group, then the tether will break and you will need to try again.
Puzzle 4:
After the third encounter, you will not want to leave the center of the room. This room has six paths leading out of the room. If you stand in the center looking at the spinning platform path, the path to your immediate left is where to start. Just over the edge of the path, you will see the box to start the tether. Like the last puzzle, you will want to link all Guardians together and have the beam pass through the six nodes. This one may be tricky as one node is on the far side of a wall that, if positioned even a little off, will break the tether.
Puzzle 5:
In the same room, and the same start point, you will access Puzzle 5. This Puzzle is different than all of the others because it will require the entire group to move as one. Your goal is to get on the far side of the spinning tunnel. However, rather than jump, there is a better way.
From the start of the tether, link all six Guardians together, then make your way down the path between the start and the spinning tunnel. This will be the easiest to navigate. However, there is a twist. As soon as you turn the corner to make your way to the other side of the spinning tunnel four Spublicant enemies will come after you.
The only way to combat this without breaking the tether is allowing them to get close enough to start the self destruct and then jumping out of the way at the last minute. As long as you jump toward your Fireteam, you’ll be okay. Once the Supplicants are dealt with, you will again need to have the beam pass through all six new nodes. This will be out in the open, and as long as the fire team makes a circle at first before walking into their node, it will be quite simple to solve.
Puzzle 6:
In the wide open room with the Vex Milk waterfalls will be the final puzzle room. Run across the lake of Vex fluid and to the right of the middle waterfall will be the entrance to a cave. Continue into the cave until you see the start of the node. There will be a puzzle on the ground, but that will be for later.
Start the node and you will want to stretch the tether back toward the entrance of the cave. This will require everyone to stand as far apart as they can before the tether will break. Fight through to the exit of the cave. There will then be a ledge you can jump to to get close enough to the final conflux to solve this puzzle.
Puzzle 7:
This will actually be sent new puzzles in one step. In the room that started Puzzle 6, you would have noticed a puzzle on the ground. This will be the final solution. Have each Guardian pick a number, 1-6. When you have that, arrange yourselves in that order with one Guardian closest to the bigging conflux from Puzzle 6 and one Guardian 6 closest to the end node across the room. This is important because you want the beam of light to pass through each Guardian in the numbered order they have selected.
Once this is established, have each Guardian stand on the crystals on the floor. They are arranged like so:
Start
1 2 3
4 5 6
End
Once you are standing on your corresponding plate, the fun begins. A new beam of light will pass through the crystals in a particular order. You and your team need to replicate this quickly to advance. Once this complete seven times, the puzzle will be solved.
Our team took a few attempts to complete this. What helped us the most is knowing it doesn’t matter how you move, as long as you arrive at the correct plate. The room is small enough to not become untethered. So just pay attention to the plat you need to run to and you will get it in just a few tries.
Thank you to Rick Kackis for the video below. To follow Rick, head over to YouTube and look for KackisHD, or click here.
Step 6:
Finish Garden of Salvation
Once you complete all of the puzzles, all that is left is to complete the raid to claim your prize.
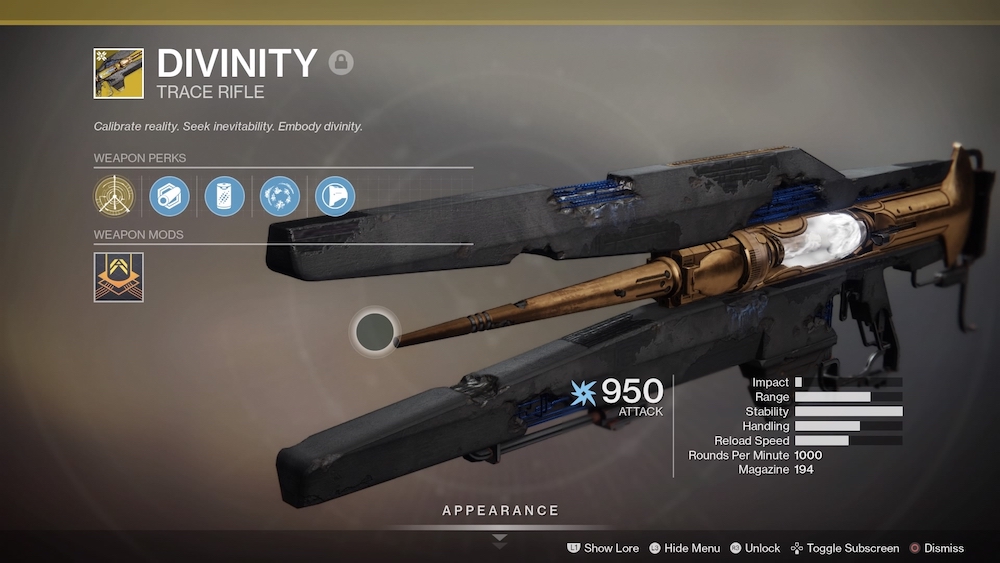
A lot has to go right in order to get this Exotic, from having an able and willing raid group to just having RNG go your way. Nevertheless, the work that goes into obtaining this gun is worth it. The ability to create crit areas on a powerful boss can sometimes be a make-or-break for a Fireteam. Regardless of if you enjoy Trace Rifles or not, you will want this weapon. Below are just some of our other guides to Destiny 2 Exotics, and as always. Keep your eyes up to PSU, Guardians.
How to get: